使用spring-boot-admin对springboot1.x版本的项目进行监听
项目中SpringBoot的版本为1.5.10.RELEASE,spring-boot-admin的版本为1.5.7,如果是其他版本的springboot请自行对照maven项目版本进行配置spring-boot-admin
Server配置
需要的依赖
1 | <dependency> |
通过<dependencyManagement>标签引用 spring-boot-admin 的父级依赖,然后在<dependencies>标签中可以不需要添加版本号方便版本号统一管理,也可不用dependencyManagement自己直接指定版本号
1 | <dependencyManagement> |
引入依赖后修改项目启动的端口号(也可不修改,默认8080),打开application.yml文件
1 | server: |
配置后,启动访问 http://localhost:8081 如下图,暂时没有client项目启动所以列表为空:
Client配置
需要的依赖(依赖的版本号同Server一样),因为spring-boot-admin-starter-client中已经包含了spring-boot-starter-actuator包所以这里没有引入
1 | <dependency> |
<dependencyManagement>标签
1 | <dependencyManagement> |
打开application.yml文件,添加配置
1 | management: |
如果项目是配置成WAR包启动的话,yml中需要添加spring.boot.admin.client.service-base-url=项目访问地址,如果不添加的话项目监控无法识别项目访问地址,会抛异常信息如下,已经很明确的指出如果是部署到Server容器启动需要指定service-base-url填入项目访问路径
1 | 2019-05-18 14:36:34.124 [registrationTask1] ERROR org.springframework.scheduling.support.TaskUtils$LoggingErrorHandler:95 - Unexpected error occurred in scheduled task. |
然后启动项目,查看Server端页面,在列表中展示了我们已经启动的client项目,Status为UP代表项目正常运行
点击details按钮进入详情页查看项目信息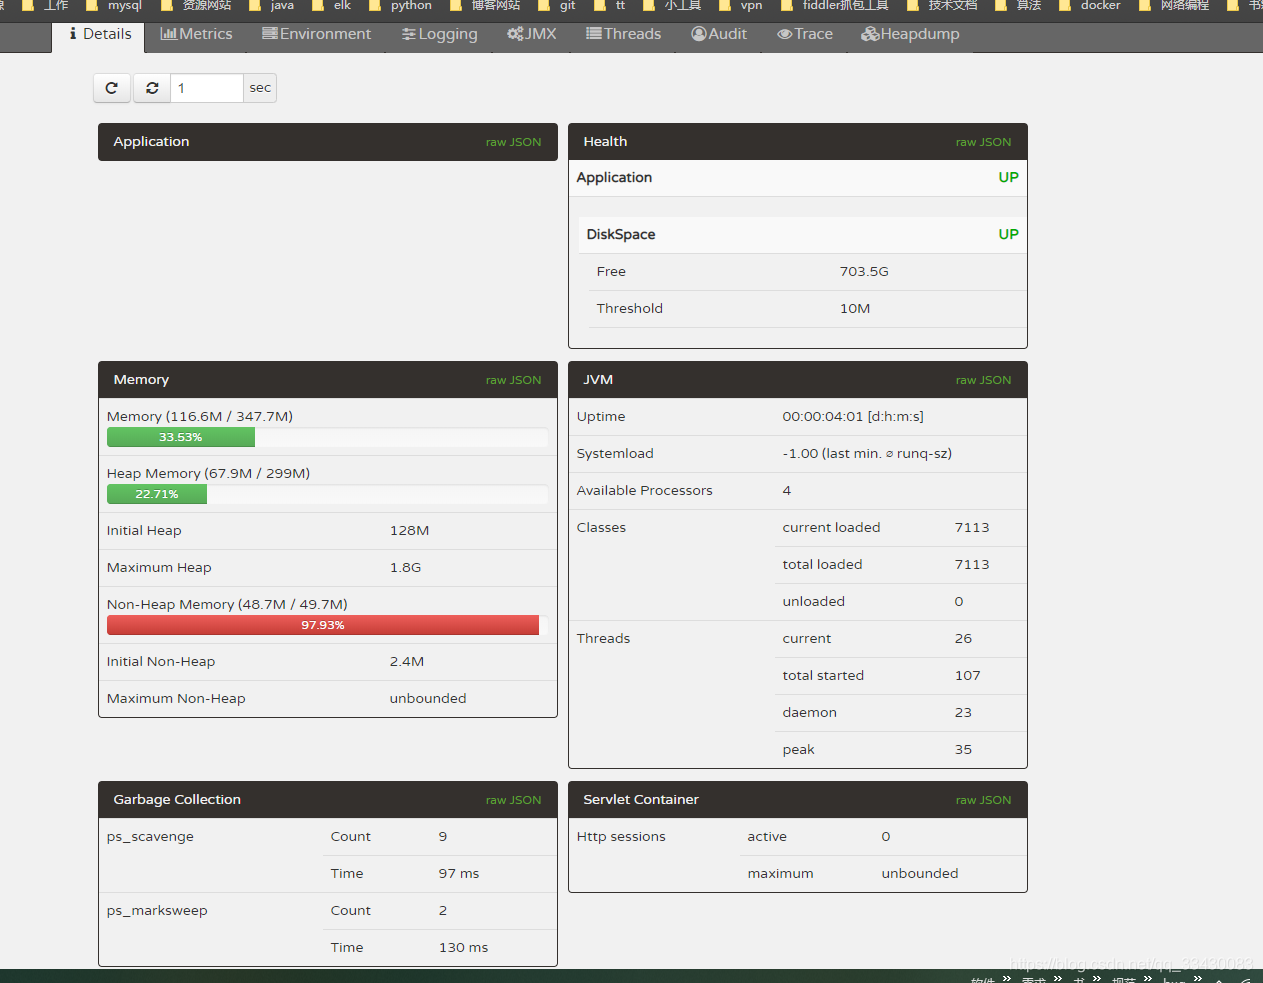
添加安全验证
给server端添加
需要添加的的依赖
1
2
3
4
5
6
7
8
9
10<!-- 继承自spring-boot-admin-dependencies,给server添加登录页面 -->
<dependency>
<groupId>de.codecentric</groupId>
<artifactId>spring-boot-admin-server-ui-login</artifactId>
</dependency>
<!-- 引入springboot权限配置 -->
<dependency>
<groupId>org.springframework.boot</groupId>
<artifactId>spring-boot-starter-security</artifactId>
</dependency>application.yml文件添加security.user.name和security.user.password配置,指定账号密码1
2
3
4security:
user:
name: admin
password: 123456
服务端完整配置如下
1
2
3
4
5
6server:
port: 8081
security:
user:
name: admin
password: 123456添加Security的权限拦截,参考自spring-boot-admin官方文档 http://codecentric.github.io/spring-boot-admin/1.5.7/#_securing_spring_boot_admin_server
1
2
3
4
5
6
7
8
9
10
11
12
13
14
15
16
17
18
19
20
21
22
23
24
25
26
27
28
29
30
31
32
33
34package com.lx.config;
import org.springframework.context.annotation.Configuration;
import org.springframework.security.config.annotation.web.builders.HttpSecurity;
import org.springframework.security.config.annotation.web.configuration.WebSecurityConfigurerAdapter;
/**
* 权限拦截配置
*
* @author 段誉
* @create 2019-05-17 13:04
*/
public class SecurityConfig extends WebSecurityConfigurerAdapter {
protected void configure(HttpSecurity http) throws Exception {
// Page with login form is served as /login.html and does a POST on /login
http.formLogin().loginPage("/login.html").loginProcessingUrl("/login").permitAll();
// The UI does a POST on /logout on logout
http.logout().logoutUrl("/logout");
// The ui currently doesn't support csrf
http.csrf().disable();
// Requests for the login page and the static assets are allowed
http.authorizeRequests()
.antMatchers("/login.html", "/**/*.css", "/img/**", "/third-party/**")
.permitAll();
// ... and any other request needs to be authorized
http.authorizeRequests().antMatchers("/**").authenticated();
// Enable so that the clients can authenticate via HTTP basic for registering
http.httpBasic();
}
}配置过后启动项目,如下图,输入之前配置的账号密码
admin和123456即可登录成功

服务端配置过账号密码后客户端也需要添加配置,打开client的
application.yml文件添加spring.boot.admin.username和spring.boot.admin.password设置要和server中设置的一致1
2
3
4
5
6
7
8
9spring:
application:
name: client-jar
boot:
admin:
url: http://localhost:8081
# 指定连接服务端的账号密码
username: admin
password: 123456客户端完整配置如下
1
2
3
4
5
6
7
8
9
10
11
12
13
14management:
context-path: /client_jar
security:
enabled: true
spring:
application:
name: client-jar
boot:
admin:
url: http://localhost:8081
username: admin
password: 123456
server:
port: 8082然后再启动项目client项目就可以在server中看到了

给client端添加
需要添加的依赖
1 | <dependency> |
打开application.yml文件,将management.security.enabled设置为true,表示开启安全验证,添加security.user.username、security.user.password和security.basic.path配置
1 | management: |
重启项目,访问项目监听接口中的任意代码,发现会弹出登录弹窗,例如访问/loggers接口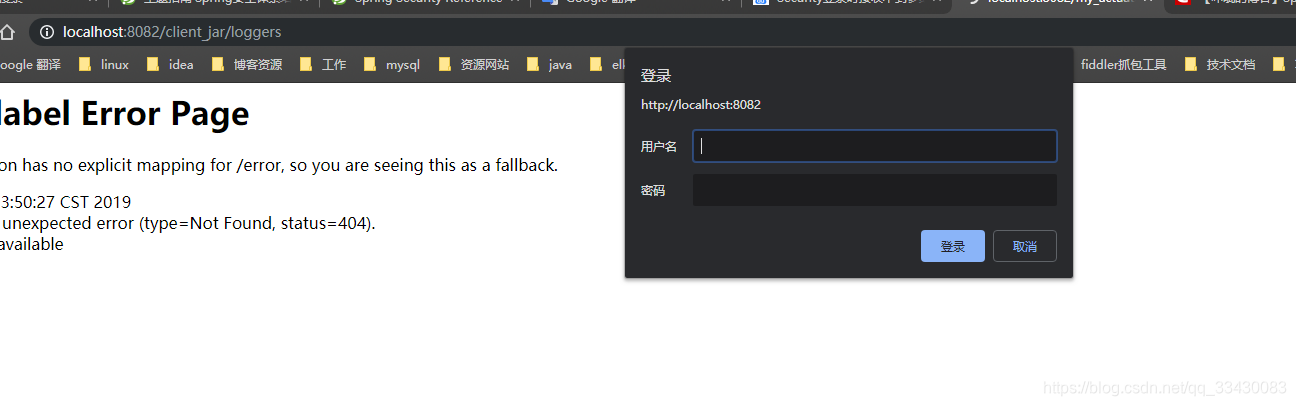
输入配置的账号密码后即可正常返回数据
这个时候访问服务端监听页面发现client-jar客户端连接不上
是因为客户端也设置了账号密码但是在连接到服务端时没有传入账号密码导致的需要添加spring.boot.admin.client.metadata.user.name和spring.boot.admin.client.metadata.user.password传入设置的账号密码就可以了
1 | spring: |
完整配置信息如下
1 | management: |
再重新client端,然后登陆server端页面,可以正常监听client端
Demo地址
https://gitee.com/fengzxia/springboot-admin-and-actuator-learn
作者: 只是学习学习
邮箱: fengzxia1000@163.com
原文地址: https://fengzxia.gitee.io/posts/3a8da9de.html
版权声明: 商业转载请联系作者获得授权,非商业转载请注明出处。